Think less; paint more.
Draw more--
More often.
And for longer stretches of time.
Paint just as much.
Read less on-line; read more actual books.
Spend less money on unnecessary things; so I can afford more of the things I want most.
Spend less time on-line, to have more time to spend in the studios (art and music.)
Get organized (and stay organized!)
Practice piano and bass several times weekly.
Sketch or draw--
Every.
Single.
Day.
15 December 2014
10 October 2014
A new drawing (in progress)...
2014 is nearing its end, and (as longtime readers of this blog know) I am always struggling to finish a few projects before NewYear's, each year.
This year is no different.
I'm hoping to get much further (although I'm hoping to finish it, I'm also a realist) with The Presentation of Spiders, and a couple other in-progress paintings, but I've also started a drawing, which will be among the first pieces I start in 2015. I'm pretty pleased with this so far... (At this point, it's about half done.)
(If nudity offends you, don't look...)
14 September 2014
Figure Painting Workshop
I spent yesterday and today in a basement studio 40 minutes from mine, in a figure painting workshop led by Romel de la Torre. This was the first professional instruction I've received since graduating from KCAI in 2005.
I really enjoyed the workshop, but it expect that the long-term benefits won't become apparent until I have had some time to actually apply what I learned, to my own (future) work. It's going to take a while to fully process everything I learned/discovered during this experience.
Yesterday, we watched Romel start a figure painting from the model, and then we started our own figure paintings, also from a live model. This morning, we observed as Romel finished his, then he gave us pointers and advice as we finished ours.
It was over far too quickly.
I took several pages of notes, and photos of Romel's and my paintings in progress.
Here's my completed painting:
I didn't start this with any goal other than to learn. I didn't even have in mind any specific things I wanted to learn. I certainly didn't intend to have a finished painting, or "product", when it was over--and, I basically don't. What I do have is a set of experienced that have shown me some news ways of approaching colour, value, and form...!
23 August 2014
Prints of "Elizabeth" now available!
The prints of "Elizabeth" are here, and they look awesome! These are limited to 250 high-quality giclee prints on acid-free paper, signed/numbered with certificates of authenticity, archival materials throughout. Definitely suitable for framing! Choose from 8x10 (matted to 11x14) for $35.00 (plus s&h) or 11x14 (matted to 16x20) for $50.00 (+ s&h).
To order, please send me your name, email address, shipping address, specify print size and quantity, and I'll send you an invoice. PayPal, all Major credit cards accepted.
Prints make unique gifts!
The image in the previous post is just to give you a rough idea of what your print of "Elizabeth" will look like; the actual prints look much better, and show lots more detail. The colour in these prints is truly amazing. Please allow 2 to 4 weeks for delivery.
Thanks!
10 August 2014
Meet "Elizabeth"...
Well, I finished her in time for the show yesterday! There are (as always) lots of things I could improve, but I'm going to save those for my next paintings, and call this one finished!
Liora named her Elizabeth...

Liora named her Elizabeth...
08 August 2014
Surprise...!
I was planning to wait until tomorrow to post this, but there's a ton of "family stuff" going on this weekend, so I might not get around to this 'til early next week, and I wanted a record of this now.
Liora hasn't named her, yet, but she's very nearly complete...

Liora hasn't named her, yet, but she's very nearly complete...
14 June 2014
Another "small spider" painting...
I've posted pics of this before, and I may have even called this "finished"--I certainly exhibited it before it was "this far along"--but, it wasn't really "done" until about a month ago, when it first looked like this:

It's finished, and I'm going to get it photographed (so there will be prints of this available sometime in August, at the latest).
There's quite a bit of detail in this that really needs to be seen "in person" to be appreciated, but the print will still capture quite a bit of that.
I'm working on four new paintings right now (!) hoping to have at least three of them done by mid-August. Stay tuned, in-progress photos coming soon.
23 May 2014
The next two months...
A friend called the other day, and mentioned the possibility of me showing at the June First Friday (Kansas City) gallery walk. I haven't shown at this particular gallery before, but I have shown during First Fridays a few times.
I expressed interest, but (honestly) I'm not really ready. (If he doesn't call me back, I won't feel very bad about not showing next month.)
I don't like putting together a show when I feel that I haven't created enough new work to really justify having a show. And I've completed only one painting since my last show (last month). I have another painting almost finished (you've seen it "in progress" here), and I could have it ready by the first week in June--but it might be rushed, and that doesn't always lead to the best work.
I do feel a bit guilty, in that I know there are artists out there who really struggle getting shows, and here I am writing about being offered a possible show that I would almost rather not do. But, I want people who come to a show to see lots of new stuff.
-------------------------------------------------------------
I did find out about an upcoming art competition sponsored by a national art magazine. It's a themed show, and fits perfectly with my current work (no, not the spiders). I'm going to make three more paintings over the first two months this summer, and enter four paintings, and hope that at least one of them gets published.
Wish me luck!
18 May 2014

04 May 2014
New painting in progress (and a painful, but significant, realization)...
Julie Farstad, my seniour painting teacher at the Kansas City Art Institute, once asked me, "What do you want your figures to be doing?"
It's a question I've though about a great deal since graduating in 2008--and a question I still haven't answered.
I've been working on a figure drawing for a painting I've had in mind for a while now. The drawing has undergone a few permutations, and although I thought I liked the concept, I've never been pleased with any of my attempts to draw the pose.
The painting was going to be of a nude woman holding her arms outstretched, and wrapped around her fingers would be a spiderweb in a loose "Cat's Cradle" weave, with three or so spiders crawling through the webbing.
I realized (yes, only just) now that this is a truly silly idea.
Now, in my defense (if that's the right word...) I have seen numerous extremely well-done paintings of far worse concepts. Most fantasy and science fiction illustrations are sillier--and more sexist. I have nothing against nudity, or even overt eroticism, but, I have no real reason why this figure would be nude. My intention isn't to make spiders seem "sexy".
I've been working on the next of my "Invented Faces" (pictured as it looks, so far) and on an old painting I'm restoring. Once the restoration was done, I wanted to get to work on some new figure drawings.
Now, however, I think I need to answer the question, before I can really put in the serious time it'll take just to get two or three conceptually rigorous drawings done--not to mention the paintings themselves!
23 April 2014
Professional Development:
I haven't attended any classes or workshops since graduating from the Kansas City Art Institute in 2008. There have been a number of such things offered in and around Kansas City in that time, but I have little interest in painting en plein aire, or still life, or alla prima...and most, if not all, of the recent locally-offered workshops which most, if not all, of local workshops seem to cater to these genres.
So, when I saw a friend's post yesterday on FaceBook that a second two-day figure painting workshop had been added (since the first workshop sold out in one day), I didn't hesitate to sign up.
I'm really looking forward to this; I think it's going to help tremendously with the work I really hope to do, soon: larger, figurative (including multi-figure paintings) from (primarily) imagination.
Anyway, I'm done with shows for a while, and plan to finish the four or five pieces I'm working on now, then start working on some new drawings, in preparation for attending this workshop in September:
http://www.tinagarrett.com/shop/2-day-figure-painting-workshop-with-romel-de-la-torre
22 April 2014
I had a nice three-day weekend, and I spent quite a bit of time in the studio. I am working on a new painting in the "Invented Faces" series, and I finished the small spider painting (even though it was exhibited in the show on the Eleventh, I didn't feel like it was quite "finished", so I kept at it. I wanted it to be "right")
I mixed up another batch of Gamblin's "Traditional Gesso" Saturday night, and tonight I (finally) applied a couple coats to a couple of panels (after the initial three coats of Liquitex "gesso" (acrylic-based materials aren't really "gesso", but they are a sealer and primer--which gesso is, as well--so the term stuck.).
--the photo shows the double-boiler with the "Traditional Gesso" mixture...
Im going to try something with these next few panels; the panels I've made up to now, I've been able to achieve a very smooth surface, but the "Traditional Gesso" is incredibly absorbent; in some cases, the first layers of oil paints applied to the surface have dried as fast as acrylics!
Not all all what I want.
So, to these next three panels, I'm going to apply a thin coat of linseed oil, hoping that it will be absorbed, and saturate the layer of gesso, hopefully blocking the oil paint from being as readily absorbed.
I guess I'll find out when the painting commences on these panels in a few weeks; I still have to make the drawings for these paintings, before it can actually start painting.
 But, it feels good to have some new panels prepared and ready to go...
I mixed up another batch of Gamblin's "Traditional Gesso" Saturday night, and tonight I (finally) applied a couple coats to a couple of panels (after the initial three coats of Liquitex "gesso" (acrylic-based materials aren't really "gesso", but they are a sealer and primer--which gesso is, as well--so the term stuck.).
--the photo shows the double-boiler with the "Traditional Gesso" mixture...
Im going to try something with these next few panels; the panels I've made up to now, I've been able to achieve a very smooth surface, but the "Traditional Gesso" is incredibly absorbent; in some cases, the first layers of oil paints applied to the surface have dried as fast as acrylics!
Not all all what I want.
So, to these next three panels, I'm going to apply a thin coat of linseed oil, hoping that it will be absorbed, and saturate the layer of gesso, hopefully blocking the oil paint from being as readily absorbed.
I guess I'll find out when the painting commences on these panels in a few weeks; I still have to make the drawings for these paintings, before it can actually start painting.
01 April 2014
My next show!
Well, my friend Sherri Acosta was invited to show some of her work at a local pub, and asked me to join her. So, we will both be exhibiting our work, one night only, at:
Friday 11 April
5 to 9 PM
At:
Conroy's Public House
5285 Metcalf Avenue
Overland Park, Kansas
Any of you in the area, please drop by!
Conroy's is a great place, with awesome food, and an expansive selection of drinks!
Friday 11 April
5 to 9 PM
At:
Conroy's Public House
5285 Metcalf Avenue
Overland Park, Kansas
Any of you in the area, please drop by!
Conroy's is a great place, with awesome food, and an expansive selection of drinks!
18 March 2014
"Presentation" Progress...
I've been working on this painting quite a bit lately, and I'm becoming more and more pleased with the results. It still has a long way to go (will I finish it in time for my 11April show? Stay tuned...) but I believe (for the first time) that I will finish it.
Anyway, here's tonight's progress; the glazing of the boy's shirt. I will do the collar when the part I painted tonight (the "red" part) has dried, and then I'll paint the two sleeves.
Once the shirt is dry, I'm going to paint the face and hands; hopefully, this weekend.

Anyway, here's tonight's progress; the glazing of the boy's shirt. I will do the collar when the part I painted tonight (the "red" part) has dried, and then I'll paint the two sleeves.
Once the shirt is dry, I'm going to paint the face and hands; hopefully, this weekend.
13 March 2014

27 February 2014
Question for my fellow Artists...
OK. Looking over my recent posts, you can see at least three recent paintings in progress, with no images of finished paintings posted. (There are actually four in-progress paintings in my studio at the moment, and I'm considering starting a couple more...)
So, the question is this:
Q: How many art projects do you work on at one time? Do you start one, then focus like a laser 'til it's done? Or, are you more like me, with several pieces in the works at any given time?
(There's no right or wrong answer, I'm just curious.)
Thanks!
So, the question is this:
Q: How many art projects do you work on at one time? Do you start one, then focus like a laser 'til it's done? Or, are you more like me, with several pieces in the works at any given time?
(There's no right or wrong answer, I'm just curious.)
Thanks!
24 February 2014
Another new painting!
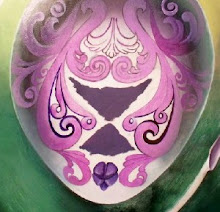
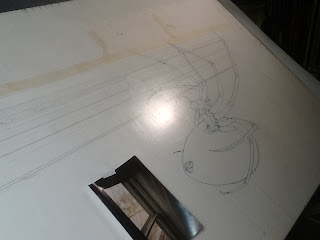
I started another new painting yesterday. Another "small spider". This was begun in (airbrushed) acrylics, then the bankground was started in oils.
I had wanted to work on one of the larger paintings--"Presentation" or "The Golden Thread"--but decided I needed something smaller to work on, too. I did work on "Presentation" last week, and plan to make real progress on it over the next week. (I'm also working on a couple of figure drawings--one new, one old--that I think show real potential.)
I'm feeling I much better about my studio discipline this year, and I intend to do even better. I've been getting into the studio more often, and being more productive when I'm in here, too.
So, it looks like I'm on schedule of achieving my goal of completing several new artworks this year!
Here's the latest, in progress, no-title-yet, 6x10 inches, acrylics (oils were added after this pic was taken), on GessoBord. (The top photo shows the first completed airbrushed section; the second is the original sketch, and the bottom image is the airbrushing-in-progress, with the frisket in place):
10 February 2014
If you can't say something nice...
I've encountered quite a bit of negativity lately, directed against art, music, writing, etc.--that some creator (an artist, musician, or writer, etc.)--doesn't like. Generally, what the "critics" finds distasteful is what they see as a lack of quality in someone else's work--usually a high-profile someone, and/or someone who is considered "good" and/or "talented" by many people.
Now, there are overrated people out there! There are people making good money who lack what many folks would consider to be "basic" skills; people who have built careers on work done by others (others who often are not being paid as much as the plagiarist); people whose primary talent is physical attractiveness, etc.
There have always been such people--and I think there probably always will be.
Personally, I would rather champion what I feel to be "quality" work: solid, well-made, innovative, creative, excellent, and/or top-notch art--than criticize junk for being (perhaps only in my opinion) junk. To me, it makes far more sense to showcase what I like, what I enjoy, and what I respect--and to explain why I value these works--than focus on why I may dislike certain other stuff.
I have occasionally been highly critical of others' work in the past, and it honestly did (usually me) more harm than good. In the recent examples of such criticism I've witnessed, it has also done little good for the folks I've seen doing the criticism.
I truly believe it is far better to promote what is good, than to continually bash what isn't.
I'm going to do my best to keep this blog focused on what works, what inspires, what I believe is "good", and ignore the stuff I don't like. There isn't enough time to devote to all the amazing stuff being done today; it certainly isn't a good idea to wast time on what isn't worthy!
[A new (preliminary) drawing--very early stages--for a new painting. Graphite on canvas, approx. 14x18 inches.]

27 January 2014
Airbrushing 102
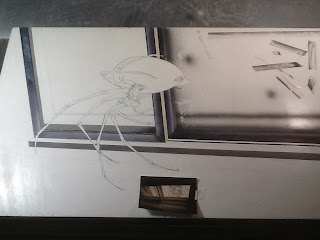
Airbrush 102: Using Frisket
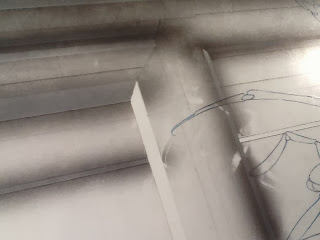
I’m using a frisket mask (“stencil”) on a section of my latest piece (“The Golden Thread”), so I decided to share some tips for working with frisket. I used to use lots of frisket in my airbrushed work, but over the years, I’ve used it less and less, usually preferring the look (and convenience) of freehand airbrushing.
I decided to use frisket for the “windowsill” on this piece, though, for two reasons. First, because the windowsill is all straight, perspective lines (and relatively thin lines, at that) it would be difficult to airbrush them freehand, and have them look straight, smooth, and precise.
Second, since the vast majority of my “older” work relied on frisket to give it that “hard-edged” look, keeping that look for a portion of this piece provides a visual “link” between this piece, and my older, airbrushed, science fiction stuff.
Frisket is a thin sheet of clear vinyl or plastic, with an adhesive on one side. It is sold in rolls or sheets in various sizes, and the adhesive side is protected by a non-stick paper backing. The thickness of the frisket can vary from very thin (and hard to manage) to rather thick (and also hard to manage). Frisket has a matte or a glossy finish, and it can have either a strong adhesive (high tack), or a weaker adhesive (low-tack). (I prefer the low-tack, matte finish.)
Once you have your drawing worked out (for frisket work, you can’t be too precise!) cut a section of frisket large enough to completely cover the area you want to paint, leaving enough additional coverage outside that area, to catch any overspray. Carefully remove the backing paper, and gently lay the frisket on the area to be painted. Press it gently into place, smoothing it from the center outward, to avoid bubbles.
Using a X-Acto knife (with a fresh, sharp blade!) carefully cut the shape you want to paint, and (carefully) remove the frisket covering the area to be painted. Thin frisket may tear, and come off in sections, so make sure to completely “open” the area. (Any frisket left where you don’t want it, will block whatever it’s covering, preventing that area from being painted.)
Always make sure you have enough frisket around the area, to block any overspray. Or, you can masking tape to attach scrap paper to the edges of the frisket. Make sure the paper extends to the edges of your work, and use enough tape so there are no gaps along the edge where the paper meets the frisket.
(Using scrap paper means you don’t have to use as much frisket.; a good thing, since frisket is more expensive than scrap paper and masking tape!)
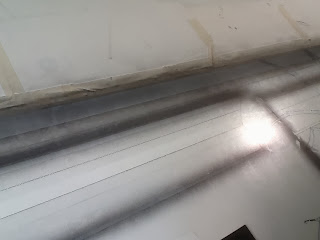
(I used scrap paper along one edge, but the rest of the painting was frisketed, so what I was doing would be clearer.)
One important thing to remember: if you’re using frisket for an area with multiple sections of a similar colour to each other, you don’t have to paint each section separately, re-frisket each section separately—as long as the same basic colour-scheme applies to the entire area.
Since the window-frame will be painted basically blue-grey, as long as I work from dark to light--“opening” the darkest section first, then the next-darkest, and so on, all the way to the lightest section--I can leave each previous section “open”, as I paint the next, successively-lighter sections. You do have to “plan” your piece in advance (a clear, accurate drawing is essential) so you know where the darkest sections are, the next-to-the-darkest, etc.--so you can open them in the proper order, darkest to lightest.
And you’re ready to paint the first area. Build the colour up gradually; using multile less-intense layers, rather than trying to get to the full intensity you want, in one or two passes. Start and stop your strokes well beyond the edges of the frisket; often, when you change direction with your airbrush, a hesitation mark (“barbell”) of intense paint will show at the end of each stroke, and you don’t want that on the open area you’re painting!
Keep your practice mark on the frisket or scrap paper.
So, after you have the darkest area painted to your satisfaction, proceed to the next-to-the-darkest area, and so on. Continue working until you have the entire area painted. Then, remove the remaining frisket, and figure out which section is next, and go for it!
Don’t forget to clean your airbrush as you go, and especially when you’re done for the day, according to the cleaning tips I posted in the previous entry.
Have fun!
I’m using a frisket mask (“stencil”) on a section of my latest piece (“The Golden Thread”), so I decided to share some tips for working with frisket. I used to use lots of frisket in my airbrushed work, but over the years, I’ve used it less and less, usually preferring the look (and convenience) of freehand airbrushing.
I decided to use frisket for the “windowsill” on this piece, though, for two reasons. First, because the windowsill is all straight, perspective lines (and relatively thin lines, at that) it would be difficult to airbrush them freehand, and have them look straight, smooth, and precise.

Second, since the vast majority of my “older” work relied on frisket to give it that “hard-edged” look, keeping that look for a portion of this piece provides a visual “link” between this piece, and my older, airbrushed, science fiction stuff.
Frisket is a thin sheet of clear vinyl or plastic, with an adhesive on one side. It is sold in rolls or sheets in various sizes, and the adhesive side is protected by a non-stick paper backing. The thickness of the frisket can vary from very thin (and hard to manage) to rather thick (and also hard to manage). Frisket has a matte or a glossy finish, and it can have either a strong adhesive (high tack), or a weaker adhesive (low-tack). (I prefer the low-tack, matte finish.)
Once you have your drawing worked out (for frisket work, you can’t be too precise!) cut a section of frisket large enough to completely cover the area you want to paint, leaving enough additional coverage outside that area, to catch any overspray. Carefully remove the backing paper, and gently lay the frisket on the area to be painted. Press it gently into place, smoothing it from the center outward, to avoid bubbles.
Using a X-Acto knife (with a fresh, sharp blade!) carefully cut the shape you want to paint, and (carefully) remove the frisket covering the area to be painted. Thin frisket may tear, and come off in sections, so make sure to completely “open” the area. (Any frisket left where you don’t want it, will block whatever it’s covering, preventing that area from being painted.)
Always make sure you have enough frisket around the area, to block any overspray. Or, you can masking tape to attach scrap paper to the edges of the frisket. Make sure the paper extends to the edges of your work, and use enough tape so there are no gaps along the edge where the paper meets the frisket.
(Using scrap paper means you don’t have to use as much frisket.; a good thing, since frisket is more expensive than scrap paper and masking tape!)
(I used scrap paper along one edge, but the rest of the painting was frisketed, so what I was doing would be clearer.)
One important thing to remember: if you’re using frisket for an area with multiple sections of a similar colour to each other, you don’t have to paint each section separately, re-frisket each section separately—as long as the same basic colour-scheme applies to the entire area.
Since the window-frame will be painted basically blue-grey, as long as I work from dark to light--“opening” the darkest section first, then the next-darkest, and so on, all the way to the lightest section--I can leave each previous section “open”, as I paint the next, successively-lighter sections. You do have to “plan” your piece in advance (a clear, accurate drawing is essential) so you know where the darkest sections are, the next-to-the-darkest, etc.--so you can open them in the proper order, darkest to lightest.

And you’re ready to paint the first area. Build the colour up gradually; using multile less-intense layers, rather than trying to get to the full intensity you want, in one or two passes. Start and stop your strokes well beyond the edges of the frisket; often, when you change direction with your airbrush, a hesitation mark (“barbell”) of intense paint will show at the end of each stroke, and you don’t want that on the open area you’re painting!
Keep your practice mark on the frisket or scrap paper.

So, after you have the darkest area painted to your satisfaction, proceed to the next-to-the-darkest area, and so on. Continue working until you have the entire area painted. Then, remove the remaining frisket, and figure out which section is next, and go for it!

Don’t forget to clean your airbrush as you go, and especially when you’re done for the day, according to the cleaning tips I posted in the previous entry.
Have fun!
14 January 2014
It's finished!
First painting of 2014!
"Study for 'Legs'", oils and (airbrushed) acrylics on GessoBord, 5x7.

"Study for 'Legs'", oils and (airbrushed) acrylics on GessoBord, 5x7.

12 January 2014
Airbrushing 101...
Good evening. I've reached the point where I'm ready to start painting a new painting (the drawing has taken a while, but now that it's done...) Since a large portion of this piece is going to be painted using an airbrush, it seemd like the perfect time for an Airbrush Tutorial. If any of you have used an airbrush before, you already know some (most?) of this stuff, but I'm going to start at the every beginning, so those of who who haven't ever picked up an airbrush, can follow along.
Feel free to print this out, and keep it handy for future reference!
Airbrushing 101
Choosing an Airbrush
There are two basic airbrush types: single-action, and double-action.
If you are planning to do anything more complex than spraying flat colour, or basic stencilling, buy a double-action airbrush. The Paasche "V", Bsdger 150, or Iwata HP-SB or HP-B are good-quality, fine-detail, "illustration" or "fine art" airbrushes. They cover well for small-to-medium sized work.
For T-shirt and other fabric airbrushing, larger work (murals, large-scale paintings, or commercial airbrushed illustration on car hoods, or the sides of trucks) the Badger Crescendo, Paasche 150, or Iwata HP-C are good choices. (For actually painting cars, trucks, or boats, you'll need commercial spray equipment, which I won't be discussing here.)
Expect to spend around $130.00 to $150.00 for a good double-action airbrush.
Air Source
Airbrushes are powered by compressed air. Most airbrush artists use air compressors, though some prefer commercial gas tanks filled with C02 or nitrogen. Airbrush companies will charge you a small fortune for a "quiet" compressor, but unless you really need a small, quiet air source, you're better off with a compressor from the local hardware store. Get one with at least 1/2 horsepower, and a built-in tank. If the unit has a tank, it should come with a regulator with two gauges. One guage will show the pressure in your compressor's tank; the other will show your "working pressure"--the pressure going out of the tank to your airbrush.
For illustration work, you're probably going to paint using between 15 and 40 psi (pounds per square inch) of pressure. For T-shirts, or other projects where thicker fluids are sprayed, you'll probably be using 45 to 80 (or more) psi. Make sure your compressor (and your airbrush) can handle the pressure level you need for the type of paint you're working with.
Paint
Any paint that can be thinned to the consistency of milk, can be sprayed through an airbrush. There is also a large variety of ready-made airbrush paints (Createx, Com-Art, Badger Air-Opaque, Golden High-Flow, Liquitex Acrylic Ink, Dr. Ph. Martin's, etc.) that are fluid enough to go right into your airbrush, straight off the shelf. Except for the Ph. Martin's (which is water-based) the others I've listed are all acrylic paints that can be thinned with water, or with Golden or Liquitex Airbrush Medium.
Many other types of paint (enamels, lacquers, etc.) can also be sprayed through an airbrush. Many of these types of paint are highly toxic, especially since, when airbrushing, you are breathing them into your lungs!)
Wear a face mask or respirator when airbrushing, even if you are using paints labelled "non-toxic"! Paints are tested for toxicity by ingestion, and paints that may be (more or less) "safe" (non-toxic) to eat, can still be bad news when very fine droplets of them get into your lungs. (Your stomach has an "exit"; your lungs do not!)
Cleaning
Airbrushes have a reputation for being tempermental, requiring time-consuming, and constant cleaning. This can be true, though there are ways to avoid having to take your airbrush apart and scrub each part clean with tiny brushes after each use.
The answer is to run cleaner through your airbrush...lots of cleaner, all the time.
BEFORE you start airbrushing, fill the airbrush's colour cup with cleaner, and spray it through the airbrush. If there is any problem with your airbrush, you'll know it right away during this step. Airbrush cleaner is more fluid than even the thinnest airbrush paint, and if your airbrush won't spray cleaner properly, there's no way it's going to spray paint. Listen for sputtering or spitting, or intermittent spraying, as a clue to problems--except when the cup is just about dry; airbrushes always sputter at this point.
If everything is OK, run a SECOND colour-cup full of cleaner through, and you're ready to put paint in the cup, and start airbrushing.
WHILE painting, run a colour-cup full of cleaner through your airbrush after every second refill of the same colour, and between every colour change. (Also, between colour changes, swab a Q-tip around the inside of the cup, so that the residue of the colour you just used won't "contaminate" the new colour you're about to put in.)
AFTER Airbrushing, run THREE MORE colour cups full of cleaner through your airbrush. Then, loosen the nut which holds the needle in, pull the needle out, wipe if off (with a rag moistened with cleaner), replace the needle, and run ONE MORE colour cup of cleaner through.
Total of FOUR colour-cups of cleaner, any time you're going to stop airbrushing for more than fifteen minutes!
You're done; your airbrush is clean, and didn't require disassembly.
Cleaner
One reason many airbrushers don't keep their airbrushes clean enough to avoid having to take it apart and clean it piece by piece, is that it can be expensive to run commercial cleaners through their airbrushes as I've recommended, above. The solution is to MAKE YOUR OWN airbrush cleaner!
I've used this for more than 20 years, and it works great. Mix 1 part ammonia with three parts distilled water, and for about two bucks or so, you have 5 quarts of a really good airbrush cleaner!
For lacquers, enamels, automotive paints, sign painters paint, or other commercial or industrial paints, make sure you have the right cleaner for removing the type of paint you're using, on hand and ready to use before you start airbrushing. Some paints (such as acrylics) dry very quickly, and you don't want your airbrush to be full of drying enamel paint, while you run to the store for a can of thinner!
There you go, the basics of what you need to know before you start airbrushing.
It's late, and I'm calling it a night. The next post(s) will cover the actual steps involved as I work on a painting, with photos. Lots of photos. I hope you enjoy it.
Tell your friends!
Good night...
Subscribe to:
Posts (Atom)