2014 is nearing its end, and (as longtime readers of this blog know) I am always struggling to finish a few projects before NewYear's, each year.
This year is no different.
I'm hoping to get much further (although I'm hoping to finish it, I'm also a realist) with The Presentation of Spiders, and a couple other in-progress paintings, but I've also started a drawing, which will be among the first pieces I start in 2015. I'm pretty pleased with this so far... (At this point, it's about half done.)
(If nudity offends you, don't look...)
Showing posts with label painting. Show all posts
10 October 2014
24 February 2014
Another new painting!
I started another new painting yesterday. Another "small spider". This was begun in (airbrushed) acrylics, then the bankground was started in oils.
I had wanted to work on one of the larger paintings--"Presentation" or "The Golden Thread"--but decided I needed something smaller to work on, too. I did work on "Presentation" last week, and plan to make real progress on it over the next week. (I'm also working on a couple of figure drawings--one new, one old--that I think show real potential.)
I'm feeling I much better about my studio discipline this year, and I intend to do even better. I've been getting into the studio more often, and being more productive when I'm in here, too.
So, it looks like I'm on schedule of achieving my goal of completing several new artworks this year!
Here's the latest, in progress, no-title-yet, 6x10 inches, acrylics (oils were added after this pic was taken), on GessoBord. (The top photo shows the first completed airbrushed section; the second is the original sketch, and the bottom image is the airbrushing-in-progress, with the frisket in place):
I had wanted to work on one of the larger paintings--"Presentation" or "The Golden Thread"--but decided I needed something smaller to work on, too. I did work on "Presentation" last week, and plan to make real progress on it over the next week. (I'm also working on a couple of figure drawings--one new, one old--that I think show real potential.)
I'm feeling I much better about my studio discipline this year, and I intend to do even better. I've been getting into the studio more often, and being more productive when I'm in here, too.
So, it looks like I'm on schedule of achieving my goal of completing several new artworks this year!
Here's the latest, in progress, no-title-yet, 6x10 inches, acrylics (oils were added after this pic was taken), on GessoBord. (The top photo shows the first completed airbrushed section; the second is the original sketch, and the bottom image is the airbrushing-in-progress, with the frisket in place):
Labels:
acrylic painting,
acrylics,
airbrush,
Airbrushing,
Art,
frisket,
painting,
paintings,
panel painting,
Spiders
27 January 2014
Airbrushing 102
Airbrush 102: Using Frisket
I’m using a frisket mask (“stencil”) on a section of my latest piece (“The Golden Thread”), so I decided to share some tips for working with frisket. I used to use lots of frisket in my airbrushed work, but over the years, I’ve used it less and less, usually preferring the look (and convenience) of freehand airbrushing.
I decided to use frisket for the “windowsill” on this piece, though, for two reasons. First, because the windowsill is all straight, perspective lines (and relatively thin lines, at that) it would be difficult to airbrush them freehand, and have them look straight, smooth, and precise.
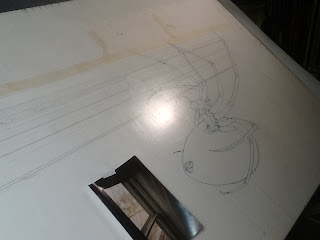
Second, since the vast majority of my “older” work relied on frisket to give it that “hard-edged” look, keeping that look for a portion of this piece provides a visual “link” between this piece, and my older, airbrushed, science fiction stuff.
Frisket is a thin sheet of clear vinyl or plastic, with an adhesive on one side. It is sold in rolls or sheets in various sizes, and the adhesive side is protected by a non-stick paper backing. The thickness of the frisket can vary from very thin (and hard to manage) to rather thick (and also hard to manage). Frisket has a matte or a glossy finish, and it can have either a strong adhesive (high tack), or a weaker adhesive (low-tack). (I prefer the low-tack, matte finish.)
Once you have your drawing worked out (for frisket work, you can’t be too precise!) cut a section of frisket large enough to completely cover the area you want to paint, leaving enough additional coverage outside that area, to catch any overspray. Carefully remove the backing paper, and gently lay the frisket on the area to be painted. Press it gently into place, smoothing it from the center outward, to avoid bubbles.
Using a X-Acto knife (with a fresh, sharp blade!) carefully cut the shape you want to paint, and (carefully) remove the frisket covering the area to be painted. Thin frisket may tear, and come off in sections, so make sure to completely “open” the area. (Any frisket left where you don’t want it, will block whatever it’s covering, preventing that area from being painted.)
Always make sure you have enough frisket around the area, to block any overspray. Or, you can masking tape to attach scrap paper to the edges of the frisket. Make sure the paper extends to the edges of your work, and use enough tape so there are no gaps along the edge where the paper meets the frisket.
(Using scrap paper means you don’t have to use as much frisket.; a good thing, since frisket is more expensive than scrap paper and masking tape!)
(I used scrap paper along one edge, but the rest of the painting was frisketed, so what I was doing would be clearer.)
One important thing to remember: if you’re using frisket for an area with multiple sections of a similar colour to each other, you don’t have to paint each section separately, re-frisket each section separately—as long as the same basic colour-scheme applies to the entire area.
Since the window-frame will be painted basically blue-grey, as long as I work from dark to light--“opening” the darkest section first, then the next-darkest, and so on, all the way to the lightest section--I can leave each previous section “open”, as I paint the next, successively-lighter sections. You do have to “plan” your piece in advance (a clear, accurate drawing is essential) so you know where the darkest sections are, the next-to-the-darkest, etc.--so you can open them in the proper order, darkest to lightest.
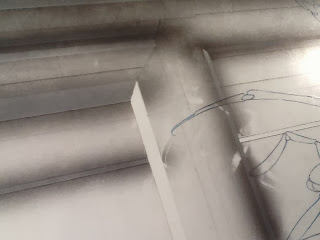
And you’re ready to paint the first area. Build the colour up gradually; using multile less-intense layers, rather than trying to get to the full intensity you want, in one or two passes. Start and stop your strokes well beyond the edges of the frisket; often, when you change direction with your airbrush, a hesitation mark (“barbell”) of intense paint will show at the end of each stroke, and you don’t want that on the open area you’re painting!
Keep your practice mark on the frisket or scrap paper.
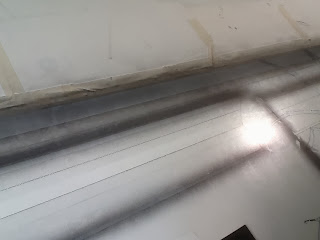
So, after you have the darkest area painted to your satisfaction, proceed to the next-to-the-darkest area, and so on. Continue working until you have the entire area painted. Then, remove the remaining frisket, and figure out which section is next, and go for it!
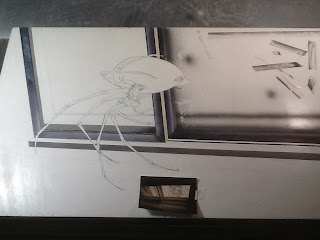
Don’t forget to clean your airbrush as you go, and especially when you’re done for the day, according to the cleaning tips I posted in the previous entry.
Have fun!
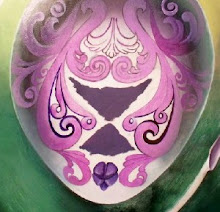
I’m using a frisket mask (“stencil”) on a section of my latest piece (“The Golden Thread”), so I decided to share some tips for working with frisket. I used to use lots of frisket in my airbrushed work, but over the years, I’ve used it less and less, usually preferring the look (and convenience) of freehand airbrushing.
I decided to use frisket for the “windowsill” on this piece, though, for two reasons. First, because the windowsill is all straight, perspective lines (and relatively thin lines, at that) it would be difficult to airbrush them freehand, and have them look straight, smooth, and precise.

Second, since the vast majority of my “older” work relied on frisket to give it that “hard-edged” look, keeping that look for a portion of this piece provides a visual “link” between this piece, and my older, airbrushed, science fiction stuff.
Frisket is a thin sheet of clear vinyl or plastic, with an adhesive on one side. It is sold in rolls or sheets in various sizes, and the adhesive side is protected by a non-stick paper backing. The thickness of the frisket can vary from very thin (and hard to manage) to rather thick (and also hard to manage). Frisket has a matte or a glossy finish, and it can have either a strong adhesive (high tack), or a weaker adhesive (low-tack). (I prefer the low-tack, matte finish.)
Once you have your drawing worked out (for frisket work, you can’t be too precise!) cut a section of frisket large enough to completely cover the area you want to paint, leaving enough additional coverage outside that area, to catch any overspray. Carefully remove the backing paper, and gently lay the frisket on the area to be painted. Press it gently into place, smoothing it from the center outward, to avoid bubbles.
Using a X-Acto knife (with a fresh, sharp blade!) carefully cut the shape you want to paint, and (carefully) remove the frisket covering the area to be painted. Thin frisket may tear, and come off in sections, so make sure to completely “open” the area. (Any frisket left where you don’t want it, will block whatever it’s covering, preventing that area from being painted.)
Always make sure you have enough frisket around the area, to block any overspray. Or, you can masking tape to attach scrap paper to the edges of the frisket. Make sure the paper extends to the edges of your work, and use enough tape so there are no gaps along the edge where the paper meets the frisket.
(Using scrap paper means you don’t have to use as much frisket.; a good thing, since frisket is more expensive than scrap paper and masking tape!)
(I used scrap paper along one edge, but the rest of the painting was frisketed, so what I was doing would be clearer.)
One important thing to remember: if you’re using frisket for an area with multiple sections of a similar colour to each other, you don’t have to paint each section separately, re-frisket each section separately—as long as the same basic colour-scheme applies to the entire area.
Since the window-frame will be painted basically blue-grey, as long as I work from dark to light--“opening” the darkest section first, then the next-darkest, and so on, all the way to the lightest section--I can leave each previous section “open”, as I paint the next, successively-lighter sections. You do have to “plan” your piece in advance (a clear, accurate drawing is essential) so you know where the darkest sections are, the next-to-the-darkest, etc.--so you can open them in the proper order, darkest to lightest.

And you’re ready to paint the first area. Build the colour up gradually; using multile less-intense layers, rather than trying to get to the full intensity you want, in one or two passes. Start and stop your strokes well beyond the edges of the frisket; often, when you change direction with your airbrush, a hesitation mark (“barbell”) of intense paint will show at the end of each stroke, and you don’t want that on the open area you’re painting!
Keep your practice mark on the frisket or scrap paper.

So, after you have the darkest area painted to your satisfaction, proceed to the next-to-the-darkest area, and so on. Continue working until you have the entire area painted. Then, remove the remaining frisket, and figure out which section is next, and go for it!

Don’t forget to clean your airbrush as you go, and especially when you’re done for the day, according to the cleaning tips I posted in the previous entry.
Have fun!
Labels:
airbrush,
airbrush techniques,
Art,
frisket,
how-to,
oil painting,
painting,
Spiders,
stencils
14 January 2014
It's finished!
Labels:
acrylic painting,
airbrush,
horror,
oil painting,
painting,
Spiders,
Surrealsim
19 May 2013
Paradigm Shift...

For a long while, I've been very jealous of certain artists who, in addition to creating amazing work, also manage to have an equally strong conceptual basis underpinning their work. Matthew Barney (creation through overcoming physical resistance); Gottfried Helnwein (the consequences of physical violence, especially--intentionally or unintentionally--against children); Patricia Piccinini (the self as refracted through a genetically-modified "Other"); Ron English (a critique of Mass culture through the subversion of commercial imagery)...
And, for many years, I've been frustrated in my own efforts to understand the possible meaning(s) in my own work--or, perhaps, to impose such meanings.
Conceptualism in visual art is usually a double-edged sword; I certainly don't want my work to merely "illustrate" an idea, nor do I want the work to become too "arid", dry, and stale--the "problem" with so much "conceptual" art, IMO, being that the ideas behind the work are far superiour to the work itself. (And, yes, I'll name names: Sol Lewitt, On Kawara, Felix Gonzales-Torres, Joseph Kosuth...)
But, a cleaner understanding of a set of "possible" meanings can have the effect of unifying a body of work, as well as providing ways by which the work can be...complicated, and yet remain thematically unified.
------------------------------------
I'm reading a book at the moment, "Tiny Surrealism: Salvador Dali and the Aesthetics of the Small". Having been singularly impressed by the small paintings at the Dali Retrospective in Philadelphia in 2005, I expected the book to discuss Dali's small works, perhaps explaining their importance in Dali's oeuvre.
But, the book does much more. It places Dali's interest in small things (ants, grasshoppers, breadcrumbs, atoms) within the larger context of his published writings, poems, and personal correspondence. It outlines a conceptual framework that unites much of the imagery in his small paintings as well as his large masterpieces. Further, it shows how the emphasis on small things, combined with Dali's technique (often vilified as merely "illustrative", or ignored completely) was an affront, as well as a response to (and a critique of) both Modernism and Surrealism.
Oddly, I may have found the beginning of a conceptual basis for my next few paintings, ideas Ive had in my head for some time, but which have felt "thin", undeveloped...until now.
Labels:
aesthetics,
Conceptual art,
delamination,
Modern art,
painting,
philosophy,
Salvador Dali
14 May 2013
More Drawing!

A couple of new "spider drawings". I have written lately about wanting to draw more, and more frequently--and (I'm pleased to report) I have been! I've been struggling--lately and always!--with the temptation to clean the studio, build more panels, read something, update my computer, catch up on emails, organize my bills, make more lists--basically, anything to waste time that could (should) should be spent actually getting artwork made...moved forward...finished.
My free time keeps getting filled, so I really don't have much time to waste. (Just tonight, a friend who has helped me move on several occasions needs my help moving this Saturday. I had hoped to spend the day in the studio (we are going out with friends Saturday evening), but I can't really say no about helping this particular friend move.
So, I have a choice--and a few free hours tonight. I can spend tonight cleaning the studio, building panels in the garage, playing games on the iPad--or creating in the studio.
So, I'm headed to the studio, to make art.
Right now.
I need to work on some new figure drawings; tonight is as good a night for that, as any.
I'll post them when they're far enough along to be interesting.
"Tres Ragni Rossi"

I finished this little painting last night. (The title means, "Three Red Spiders"; somehow, it sounded better in Italian!)
This is the first painting I've completed in 2013, and I do feel like such a slacker, writing that here. I have been working on "The Presentation of Spiders", and I hope to have an updated photo of it, soon. I've also been drawing lately, and I'm nearly ready to start painting another spider!
And, I have a new sculpture started, too.
I do feel like I'm more focused, lately, than I have been in a long time. I'm trying to concentrate on making art, more than building new panels (no sense spending time making panels, when I have paintings that aren't finished!), or cleaning my studio. (No one will compliment me on how tidy the studio is--but I will suffer if there isn't enough work for a show, soon.)
So, here's the first new painting of the year. More new stuff coming soon. Thanks for your patience, and your interest!
Labels:
oil painting,
painting,
panel painting,
Spiders
04 September 2012
Airbrushing in the "Digital Age"...
I know several illustrators who used airbrushes for the majority of their illustration work two decades ago (or more), who now use only digital tools. Many "former airbrush artists" see little reason for anyone to bother with clunky ol' airbrushes that require constant cleaning, maintenance, and replacement parts.
But, there are reasons--good ones!
Just last week, I was asked to repair an arcylic (mostly airbrushed, with some "traditional" brushwork) painting for a fellow artist. She had a 40 x 40 inch painting that had a small tear in the canvas, and she needed it fixed, so the painting could be exhibited.
My first step was to "patch" the tear. I cut a small piece of unprimed canvas (from a scrap piece I keep on-hand for exactly that purpose) and attached the patch to the back of the tear using acrylic matte gel.
Once the patch was dry, I applied gesso into the "tear" from the front, sanding it smooth once it, too, was dry.
Then, using the airbrush, I touched up the "fixed" area, matching colours to the rest of the painting.
Lastly, a bit of "traditional" brushwork, and the repair work was done, and the painting looked like there had never been any damage to it at all.
When you have a project that can't be easily fed through a printer, or when you want to retain an original photograph, document, or painting (rather than ending up with a PhotoShop corrected copy), airbrushing is one good way to go about "fixing" original pieces.
I'm going to be using airbrushes quite a bit in my next several paintings, probably with both acrylics and oils. I need to figure out a good formula for an airbrush oil-paint medium. (I have a few ideas...)
But, there are reasons--good ones!
Just last week, I was asked to repair an arcylic (mostly airbrushed, with some "traditional" brushwork) painting for a fellow artist. She had a 40 x 40 inch painting that had a small tear in the canvas, and she needed it fixed, so the painting could be exhibited.
My first step was to "patch" the tear. I cut a small piece of unprimed canvas (from a scrap piece I keep on-hand for exactly that purpose) and attached the patch to the back of the tear using acrylic matte gel.
Once the patch was dry, I applied gesso into the "tear" from the front, sanding it smooth once it, too, was dry.
Then, using the airbrush, I touched up the "fixed" area, matching colours to the rest of the painting.
Lastly, a bit of "traditional" brushwork, and the repair work was done, and the painting looked like there had never been any damage to it at all.
When you have a project that can't be easily fed through a printer, or when you want to retain an original photograph, document, or painting (rather than ending up with a PhotoShop corrected copy), airbrushing is one good way to go about "fixing" original pieces.
I'm going to be using airbrushes quite a bit in my next several paintings, probably with both acrylics and oils. I need to figure out a good formula for an airbrush oil-paint medium. (I have a few ideas...)
Labels:
airbrush art,
canvas,
digital art,
oil paint,
painting,
retouching
Subscribe to:
Posts (Atom)


